Introduction
Living off-grid, or like us in a motorhome, power consumption can be critical. Having to convert our battery DC power into AC through an inverter, then back to DC through a power supply is not the most efficient way to power any device. We love having Starlink in our overlanding truck, but the power consumption can be a bit of a concern sometimes. So I wondered… would a DC power supply save a few valuable watts that are normally lost through the DC to AC to DC process?
I have seen that others have powered their Starlink terminals with a “Tycon Systems POE-INJ-1000-WT High PoE 4 Pair Injector” with DC-to-DC power supply. However with this, the ethernet cables need to be modified: pins 4 & 5 need to be reversed going into the POE injector and then reversed again on exit (this is because SpaceX have implemented their POE on the Starlink ethernet cable slightly differently to the Tycon unit). I believe the Tycon POE injector is basically just an ethernet transformer without any circuit/voltage protection. I wanted to modify the existing SpaceX power supply because it has circuit protection built-in and would therefore be a safer option.
Warning – The voltages within these power supplies are at a lethal level (50V DC is enough to kill you!) and the capacitors within the power supplies can remain charged for a considerable time after the power has been removed. I am posting what I have done solely for the interest of others. I do not recommend anyone attempts the following modification without a professional electronics background. I have years of experience as a military qualified aircraft radar technician. I have been trained and worked with very high voltages.
Update No. 1 – Rectangular Dish Router DC Conversion (11/11/22)
Update No. 2 – Updated power calculations for DC conversion (13/11/22)
Update No.3 – Starlink 48V PSU adapter (18/5/23)
Update No.4 – Gen 3 Starlink DC Power (21/6/24)
If you sign up for Starlink with our referral code (click here), we will each receive one month of free service 30 days after activation. For more information on how it works, check out Starlink support topics here.
Modification
The power supply I have modified is part number 03480000-503, model UTP-201S, Ver.02.
1. First, I separated the base plate from the top of the power supply quite easily by prying apart the two parts along the seam with a screwdriver.

2. I then removed the two heatsink halves to reveal the power supply circuit board.
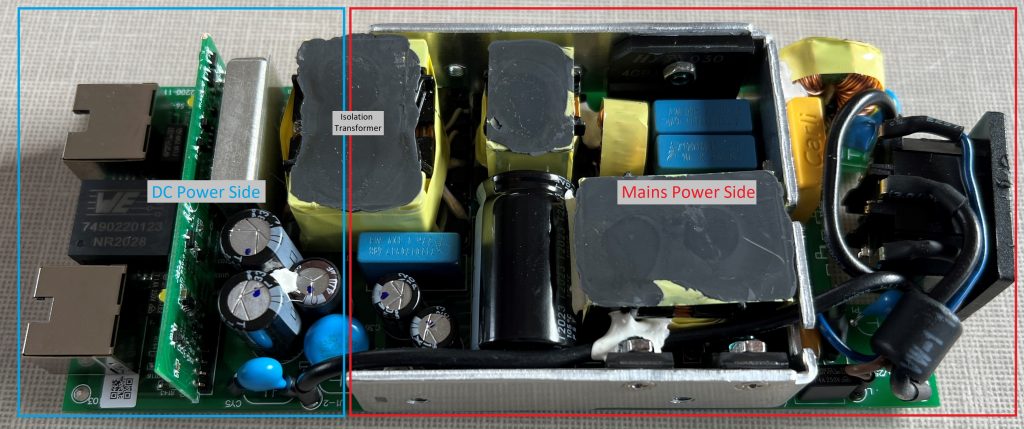
As you would expect from SpaceX, it is very well made and the circuit board is well laid out. The mains power circuit is at one end and the DC power circuit the other. The two circuits are joined with an isolation transformer.

On the underside there is a wide clear section between the two sides. I was able to easily identity:
- the 4 rectifying diodes on the output of the isolation transformer that provide the 56 V DC;
- a couple of small diodes on another winding of the isolation transformer which provide a 7 V DC supply for the control electronics within the power supply;
- a ground wire from the mains socket terminated on the DC side of the circuit board.
Note that the 56 V supply is not directly attached to the ground. The ground is connected to the ethernet socket screens (shielding) and appears to be connected to the 0V, 56V and heatsinks via Voltage Dependant Resistors (which would make sense for over voltage/surge protection).
3. Having identified the points to which I would need to make connections, I decided the best way to make the connections would be from the underside of the circuit board. However, I wanted to exit the cables out of a hole in the upper heatsink half. I therefore chose to drill 4 holes for the 0V, 7V, 56V and Ground wires through the circuit board. Holding the circuit board up to the light I could clearly see through the board and could confirm there were no internal tracks on the board in the area I wanted to drill.
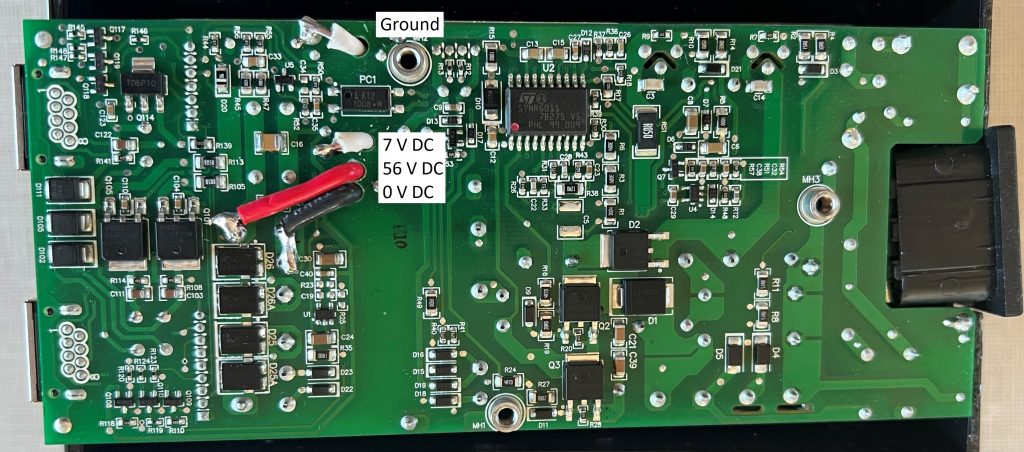
The 56V connection was quite hard to solder; it is also the rectifier diode heat sink, so took a while to heat up, but should be able to handle the current. The 0V connection was soldered to two pins due to its high current.
4. I then routed the cables through the circuit board, upper heatsink and out of the power supply case through some more drilled holes.
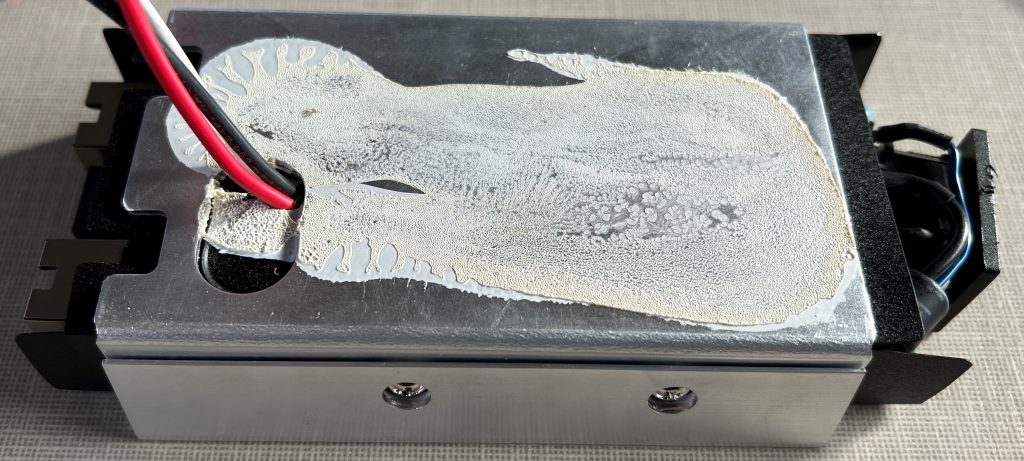
On the outside of the power supply, I have attached a plug so that the DC power supply can be easily disconnected.
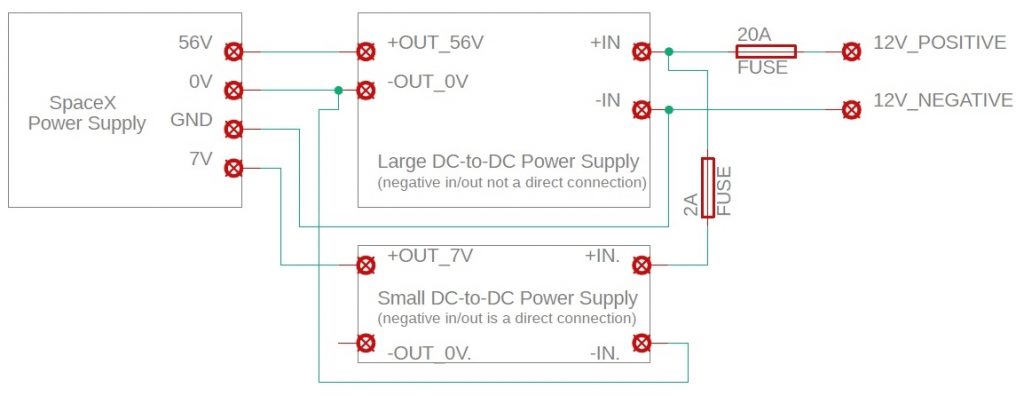
I have used two DC-to-DC power supplies: the small one provides 7V DC and the larger one 56V DC.
I have attached the small DC-to-DC power supply to the larger one and have a 20-amp fused 12V DC supply from the truck’s leisure battery feeding the large DC-to-DC power supply.
To power the small DC-to-DC power supply I connected its positive input to the large DC-to-DC power supply’s positive input, via a 2-amp fuse. The negative input of the small DC-to-DC power supply is connected to the 0V (negative) output of large DC-to-DC power supply. This was done because the negative input and 0V (negative) output of the large DC-to-DC power supply are not directly connected. If the small DC-to-DC power supply were connected to the negative input of the large DC-to-DC power supply, any fluctuation in the level of the 0V (negative) output relative to the input negative could increase or decrease the 7V level relative to the 0V (negative), which could potentially cause damage within the SpaceX power supply. The small DC-to-DC power supply has a large input voltage range of 3V to 30V, so any fluctuation in the negative level relative to the positive input should still be within limits. Because the output and input negatives of the large DC-to-DC power supply are not directly connected, the ground wire from the Starlink power supply is attached to the input negative of the large DC-DC Converter Module. This earths the system to the vehicle’s negative (chassis).
The large DC-to-DC power supply is supplied with three on board 20-amp fuses in parallel. In this application this power supply will not need to handle that much current, so I removed two fuses leaving the power supply protected by a single 20-amp fuse.
5. Before connecting the DC-to-DC power supplies to the SpaceX power supply I adjusted them for the correct outputs. The DC-to-DC power supplies have multiturn potentiometers that are turned counter-clockwise to lower settings and clockwise to increase.
The smaller DC-to-DC power supply only has one potentiometer and its purpose is to adjust the output voltage. I adjusted it so the output was 7V.
On the large DC-to-DC power supply there are three potentiometers that are used to set the under-voltage-protection, output-voltage, and current-control. I started by adjusting the one labelled UVP (Under-Voltage-Protection) so that the UVP warning LED turned off and the power supply turned on. This can be adjusted so the power supply automatically switches off when the supply voltage drops to a certain level to protect a battery from being overly discharged.
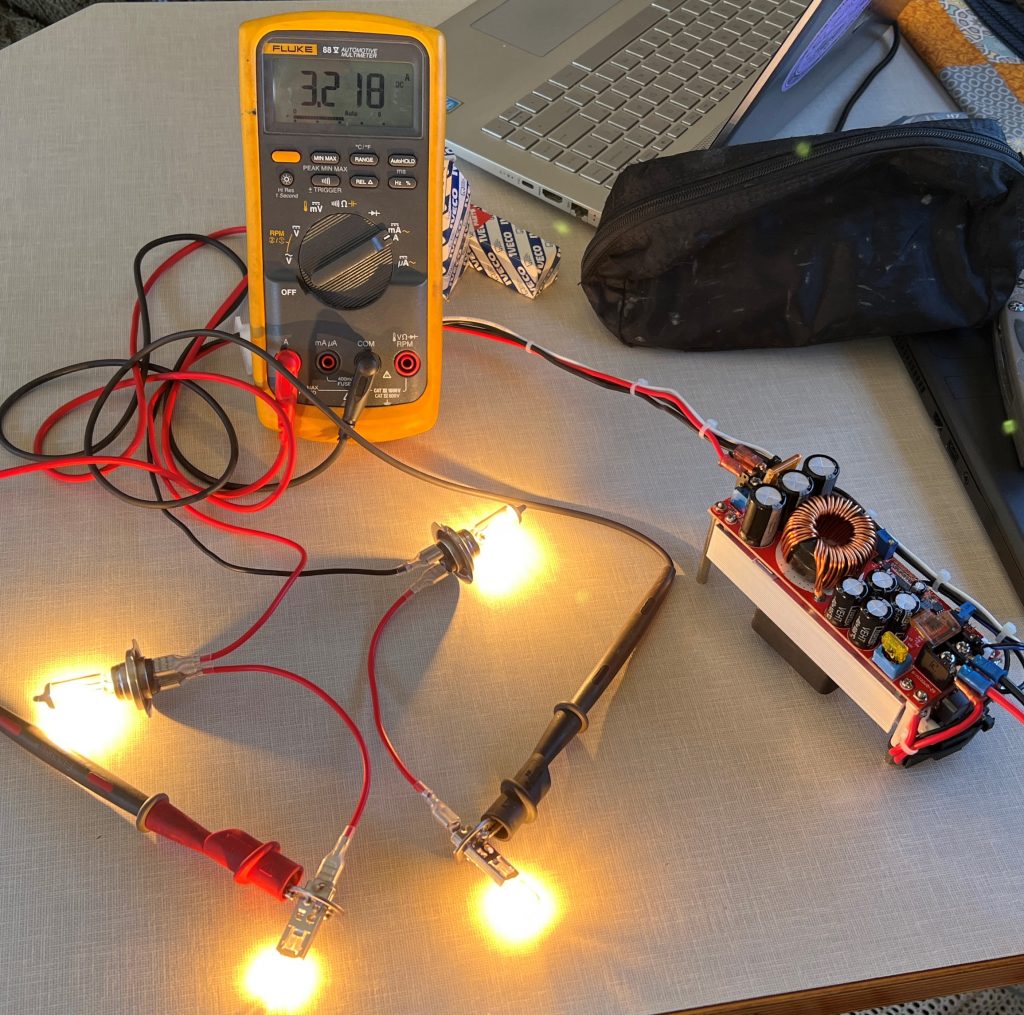
6. Next, I adjusted the CC (Current-Control) potentiometer in the middle of the board. To set the current control accurately I needed a load that could handle approximately 180W (this is to simulate the SpaceX power supply at maximum power attached to the output). I improvised this as follows:
- wiring four spare 12.8V 55W car bulbs in series to produce a load of approximately 220W at 51.2V (4.3 amps);
- adjusting the output-voltage to 45V (to protect the bulbs); and
- while monitoring the current with my multimeter, set the Current-Control to 3.218 amps – this is sufficient for the maximum output of the Starlink power supply (180W / 56V = 3.214 amps) but low enough to provide some protection should a fault occur.
7. I re-adjusted the output-voltage potentiometer to set the output to 56V.
8. Finally, once all the potentiometers were set and the outputs tested, I put a small blob of glue on the potentiometers to prevent them from moving due to vibration whilst driving.
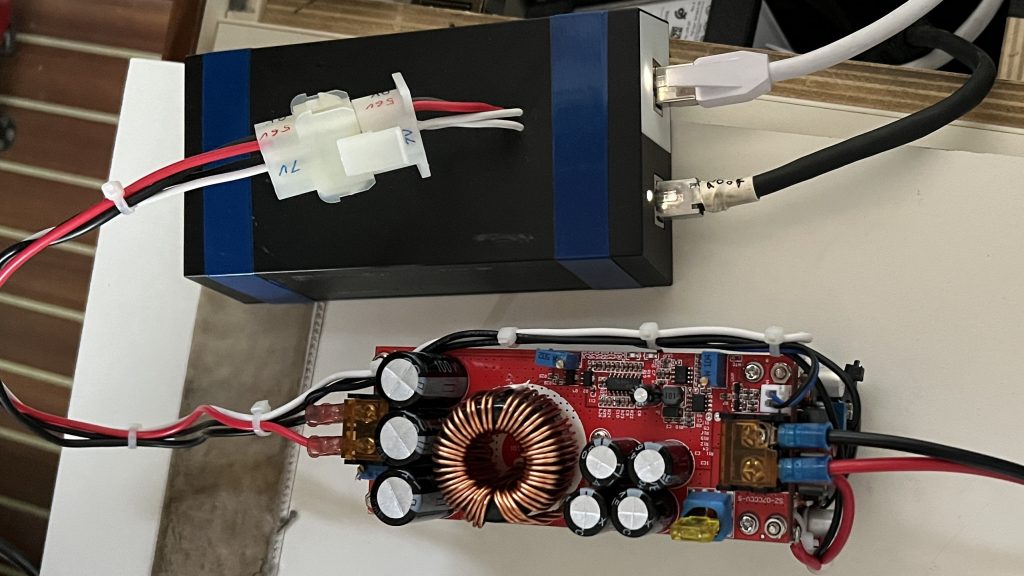
This whole power supply is mounted inside a compartment in our truck, so there is no risk of any of the power supplies or terminals being touched. I have therefore not mounted it inside an enclosure.
If I want to run on mains power, I simply unplug the DC-to-DC power supplies and then plug in the mains cable.
So… did the modifications make any difference to the power usage?
Power comparisons tests
To compare power usage, I tested the current draw from the leisure batteries. Tests were carried out with the following equipment and conditions:
- Dish Hardware – Round ‘Grey’ dish; P/N 22490000-507/A; Model UTA-211; rev2_proto4
- Dish software – 5564993e-1c93-4219-95b1-3fdb2373c468.uterm.release
- Router Hardware – Starlink Router; P/N 013822337-512; Model UTR-201; Rev.A_v1
- Router software – 2022.03.0.mr9052-prod
- On-board data logger*;
- Victron BMV 700 battery monitor;
- All other power-drawing devices were constant (off or on);
- Carried out at night so that solar charging did not affect the system; and
- Streaming live tv using Starlink to ensure the system was constantly handling data.
Test 1 – 12V DC-to-DC power supply, running Starlink for 30 mins with Snow Melt Configuration set to ‘off’;
Test 2 – 12V DC-to-DC power supply, running Starlink for 5 min with the Snow Melt Configuration set to Pre-Heat to test the DC-to-DC power supply at Starlink’s maximum power.
Test 3 – Mains power, running Starlink for 30 mins with Snow Melt Configuration set to ‘off’;
Test 4 – Mains power, running Starlink for 5 min with the Snow Melt Configuration set to Pre-Heat to test the mains power supply at Starlink’s maximum power.
Before the tests, I noted the baseline current draw without Starlink powered so that I could subtract this value from the BMV700 data to give accurate Starlink current draw figures.
Test Results
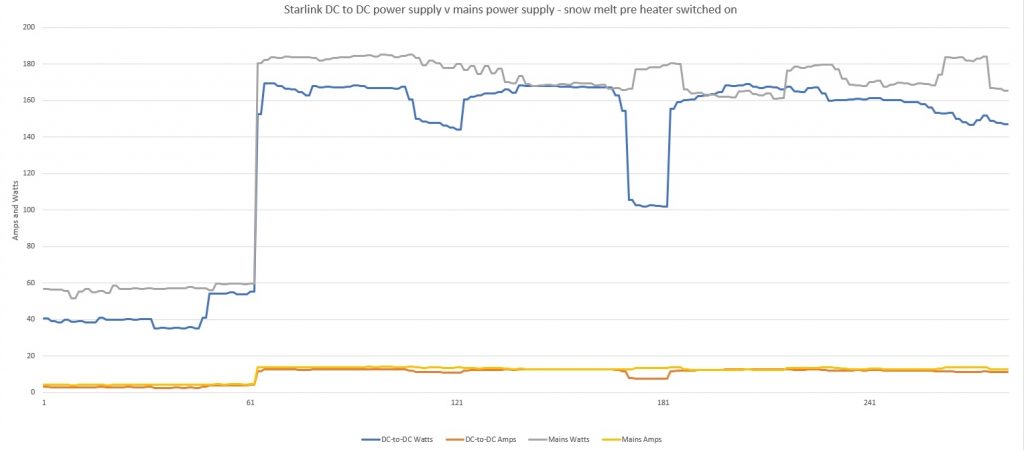
Tests 1 and 3 – running Starlink for 30 mins with Snow Melt Configuration set to off:
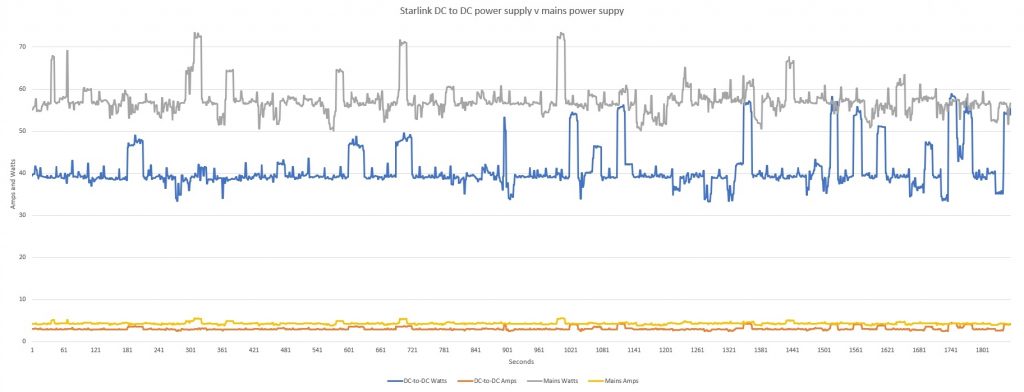
Test 1 (DC-to-DC power) – average current 3.08 amps / 41 watts. The heatsink on the DC to DC power supply reached 33.4C.
Test 3 (mains power) – average current 4.33 amps / 57 watts. The case on the SpaceX power supply reached 35.5C.
Tests 2 and 4 – running Starlink for 5 mins with Snow Melt Configuration set to Pre-Heat
Test 2 (DC-to-DC power) – average current 12.4 amps / 164 watts. The heatsink on the DC-to-DC power supply reached 37.7C, the cooling fan on the power supply didn’t start.
Test 4 (mains power) – average current 13.3 amps / 174 watts. The case on the SpaceX power supply reached 36.9C, but was still rising after 5 minutes when I turned off the pre-heating mode.
Conclusions
Tests 1 and 3 show that the DC-to-DC power supply saves approximately 1.26 amps / 17 watts or 29% compared to mains power through our inverter. A considerable saving for off-grid use.
Tests 2 and 4 show that the DC-to-DC power supply saved 0.9 amps / 10 watts or 6% with Snow Melt Configuration set to Pre-Heat when compared to mains power. Not as significant as normal operating, but still a saving.
Test results show that there is more of an advantage to the DC-to-DC converter with low power usage than there is during high power usage. I believe the reason for this is that the inverter requires a certain amount of power to operate its electronics, and this power doesn’t change much in relation to the output power of the inverter. So when the inverter is operating at high power (i.e in Tests 2 and 4) the amount of power used by the inverter’s electronics is a fairly small percentage of the total power being fed to the inverter. However, when the inverter is only producing a low output power (i.e. in Tests 1 and 3) the amount of power used by the inverter’s electronics is now a considerable percentage of the total power being fed to the inverter (even though the inverter’s electronics are using the same amount of power). There is therefore a greater percentage of power saving at the lower power settings. For us, a saving of 29% during normal operation is a significant power saving and easily justifies the modification.
You may also be interested in how we installed Starlink in our motorhome – click here.
and another page for our experience Overlanding with Starlink – click here.
Click here for our other Starlink pages.
Links to Parts used:
DC-DC Converter Module Boost DC Step Up Voltage Regulator CV Stabilizer Power Supply Module 10-60V to 12-97V 1500W 30A: https://a.co/d/bC9No99
I don’t have a link for the smaller boost buck converter I have used as Amazon don’t sell it anymore, but I would imagine these would work just as well:
AEDIKO 8pcs XL6009 Boost Converter Module DC to DC Buck Boost 3.0-30V to 5-35V Output Voltage Adjustable Step-Up Power Supply Module: https://a.co/d/bnB2CAG
* To record large amounts of data from various on-board systems, I have built a datalogger into the Arduino CAN system I have installed in my truck.
Update No. 1 – Rectangular Dish Router DC Conversion (11/11/22)
We now have a Rectangular Dish, so I decided to look at options for DC power saving (similar to the changes I made to the Round Dish system – see above).
How I did it
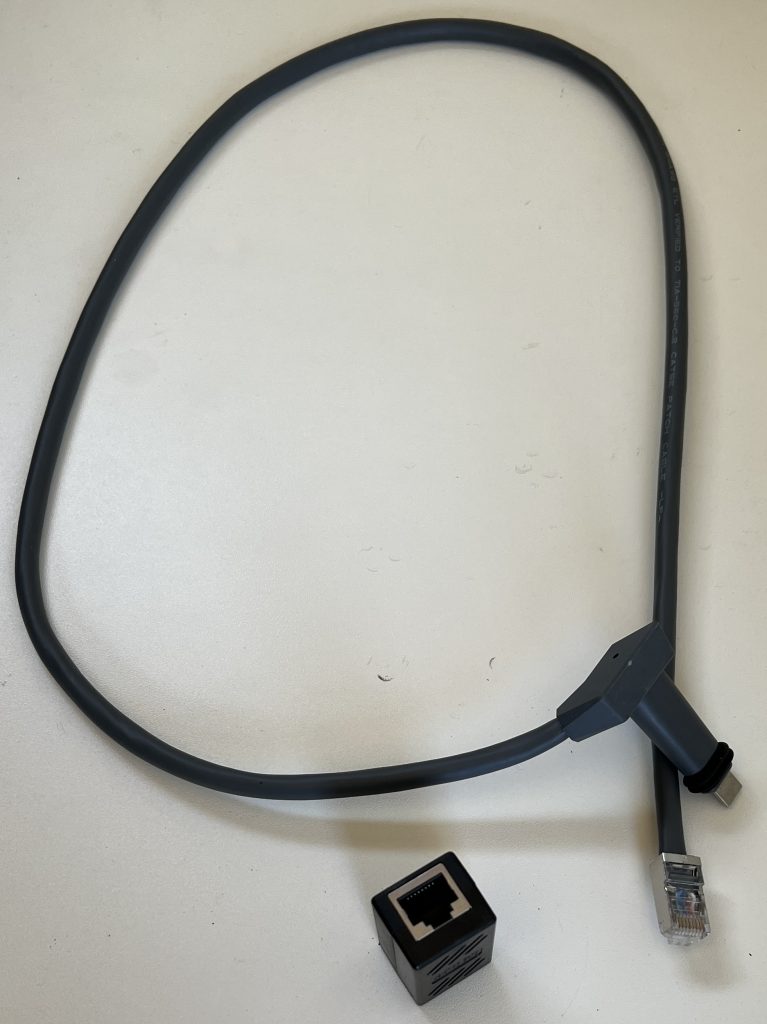
Dish-to-Router Cable: To install the Rectangular Dish into the truck, I cut its Dish-to-Router cable and added shielded RJ45 connectors wired to T-568B standard (the Dish end has a waterproof connector, see RV installation page) so that it could be plugged into the existing cabling that I had previously been using with the Round Dish. This allowed me to power the Rectangular Dish using the modified power supply from my Round Dish (see above). The Rectangular Dish POE is 48V DC rather than the 56V DC of the circular dish. As the power supply on my Round Dish is adjustable, I was able to set it to 48V DC. However, that required the use of a 3rd party router (which some may prefer).
The Router: I wanted to use the Rectangular Dish router rather than my 3rd party router, so I opened-up the Rectangular Dish Router. I removed the glass front panel by putting a knife under the edge and cutting through the glue holding it in place.
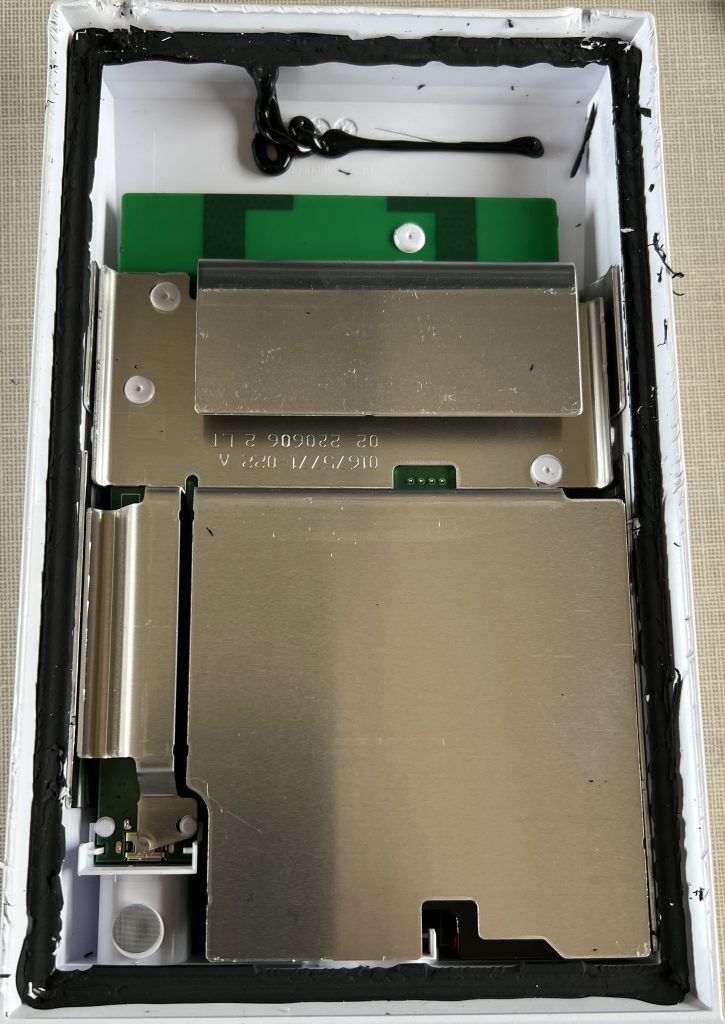
With the front panel off, I could see that the heat sinks and PCBs are held in place by plastic posts that have had their ends melted over. I used a 6mm drill to carefully drill the ‘heads’ off these melted posts (same way drilling-out a rivet) then removed the heatsink and PCBs.
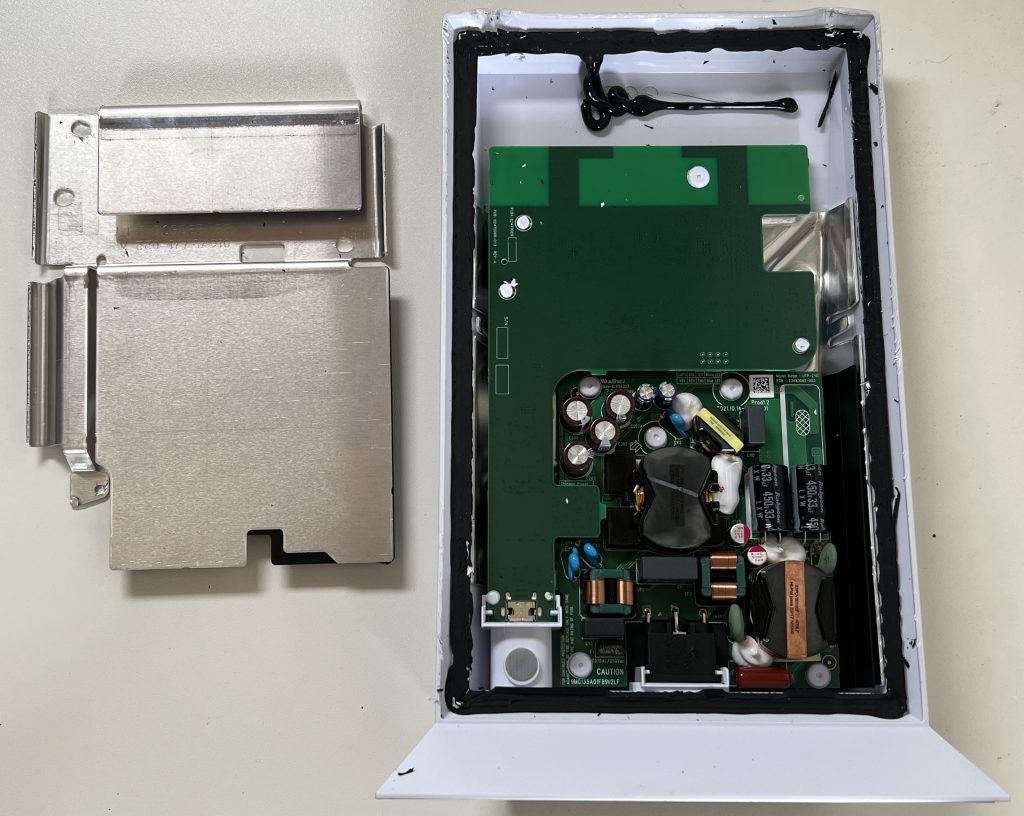
The WiFi PCB plugs onto the power supply using an 8 pin connector.
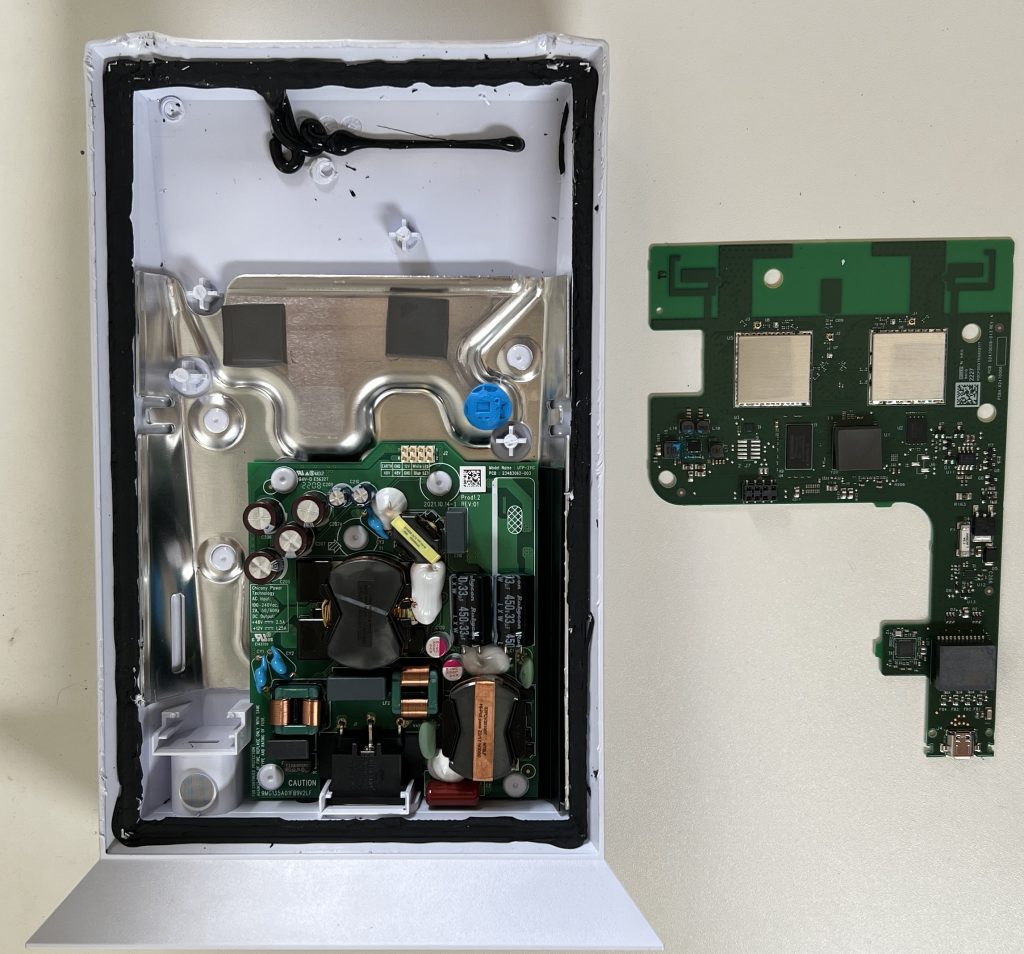
Very conveniently, the power supply shows the pinout of these pins. Also, the voltage and current requirements are all printed on the PCB.

The WiFi PCB has through-holes for the power connector. This allowed me to plug my power connector in from the other side of the PCB, which is more convenient for cable routing.
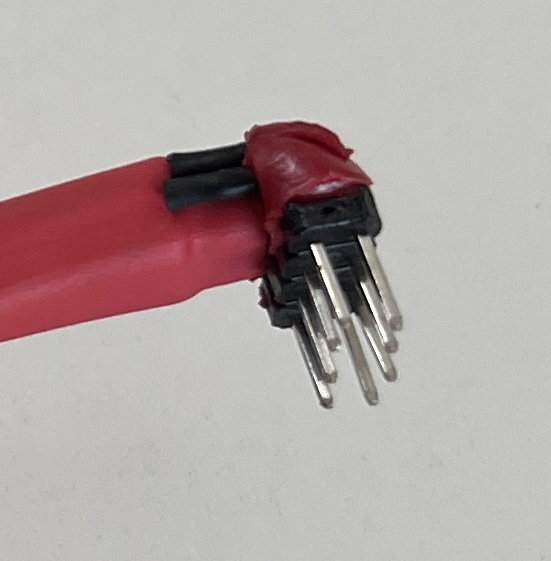
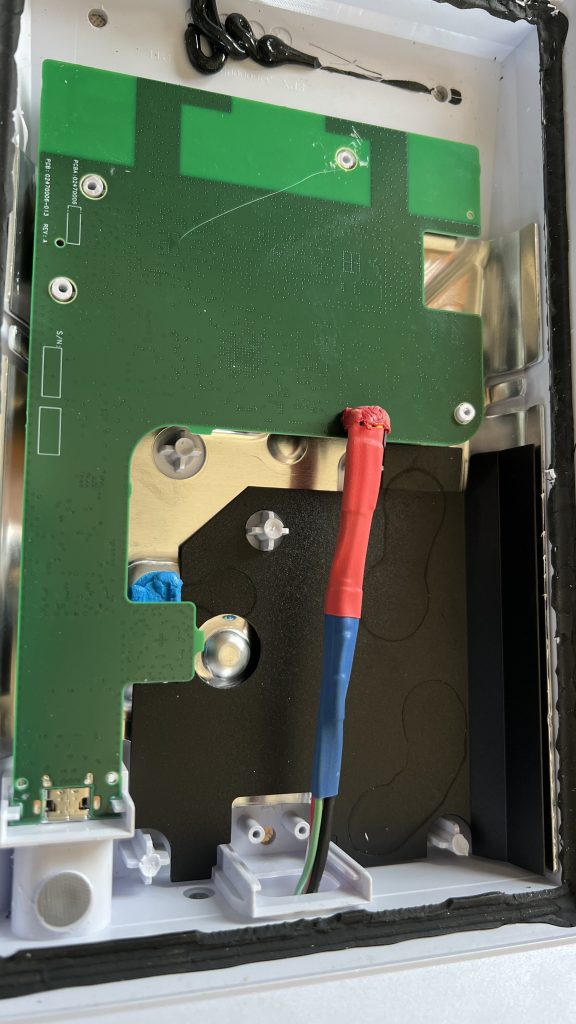
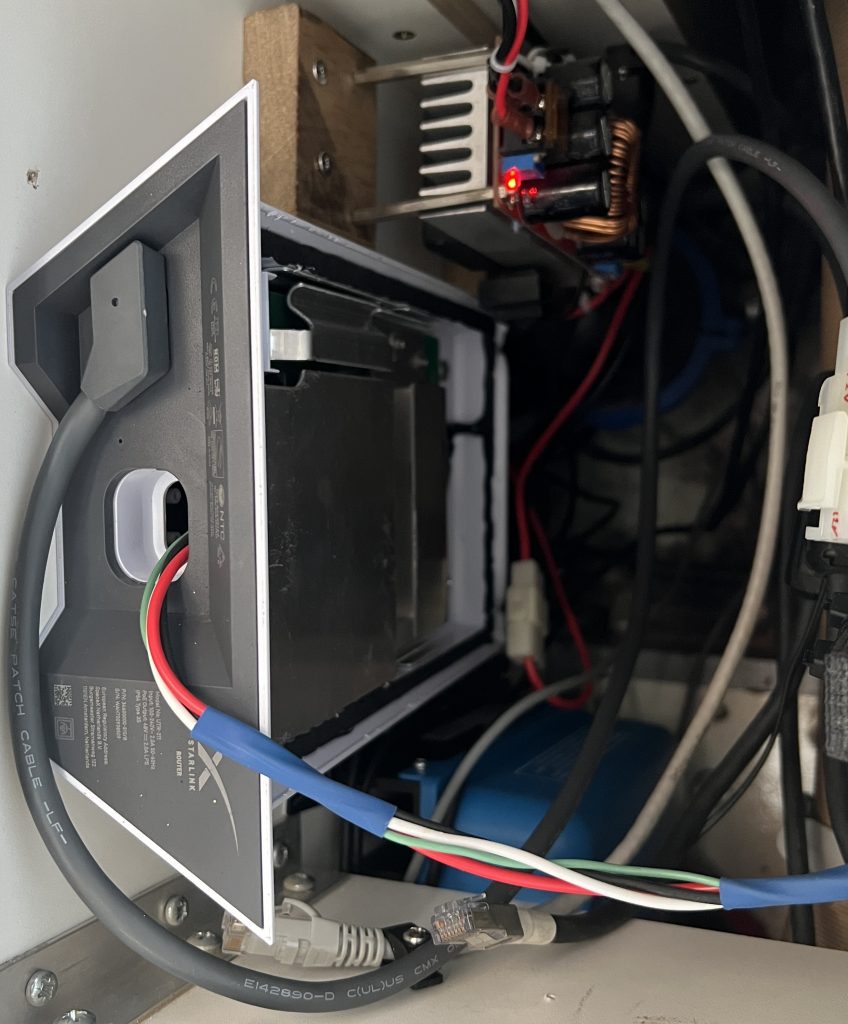
I enlarged the hole in the heat sink, then routed my DC power cable through this hole into the WiFi PCB. The other end of the cable exits the router-case through the mains power connector hole. I connected wires for 48V, 12V, ground and Earth, but have not bothered to connect the two LEDs (the router will be mounted inside a cabinet and will not be visible anyway).
I used the same type of connector on the power cables as I did for my Round Dish conversion (see above). This has allowed me to plug the Rectangular Router into the two power supplies that I used for my Round Dish conversion. However, I had to adjust these power supply outputs for the Rectangular Dish system (56V and 7V for Round Dish to 48V and 12V for Rectangular Dish).
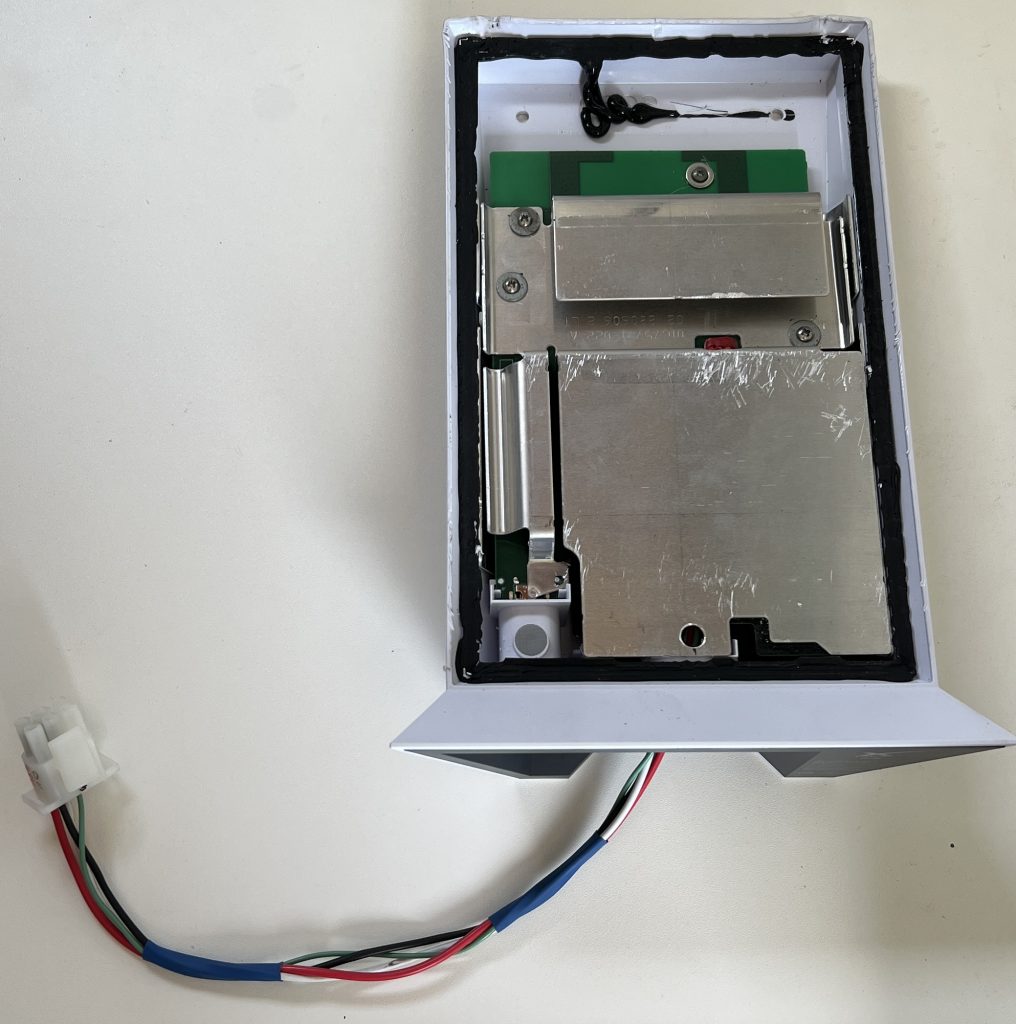
For reassembly, I drilled 2mm holes into the remaining part of the posts that had previously retained the PCBs and heatsink (i.e. the posts that previously had melted-over ends but which I had drilled-off during dis-assembly). These holes allowed me to use screws to retain the PCB and heatsink in place. I also drilled 3 holes into the back of the router to make it easy to attach to the cabinet wall in the truck. I have not bothered to glue the glass panel back on as it is enclosed inside a cabinet and there is no risk to the unit there.
Results
The Rectangular Dish powered through the inverter was averaging approximately 50W (40W for the Dish and 10W for the inverter). Now on DC, it is averaging 25W. That’s a 50% saving!!! (These figures are inaccurate, see Update No. 2 below) This is a saving of 5W compared to my Round Dish running on DC, so I am very happy. I am in a warm area at present and so cannot test the snow melt function to see how much power it uses (even if selected, it will not activate if the dish temperature is above about 5C/41F).
For full details on our rectangular dish installation see our installation page here.
Update No. 2 – Updated power calculations for DC conversion (13/11/22)
Following feedback on social media indicating that my average power consumption on DC sounded too low, I have recalibrated my power monitor and can admit that it was a little low. With the recalibration, the average power consumption on DC is 31W. This is still a significant saving compared to running through an inverter.
Calculations
AC power: I have a power monitor on the output of my inverter. This device has an average power calculation and shows an average power for our Rectangular Dish of 40W over an hour. The inverter, a Victron MultiPlus C12/2000/80, has a listed efficiency of 93% to 94% and zero load power of 9W to 11W. So using the inverter’s specified efficiency of 94%, the 40W output would have required 42.5W at the input. Add to this the specified average zero power of 10W, this results in a total load on the batteries of 52.5W.

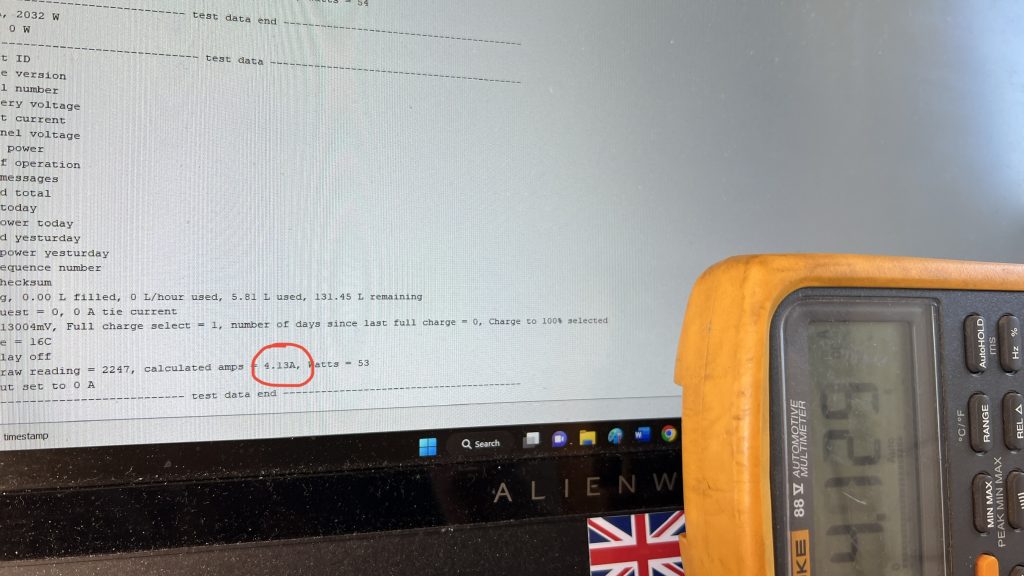
DC power: to re-calibrate my Arduino that is monitoring the DC current draw of the converted Rectangular Dish, I replaced the Starlink (which has a fluctuating current draw) with a 55W bulb (that has a more constant current draw). I then connected my Fluke 88 Automotive Multimeter in-series with the Arduino current sensor.
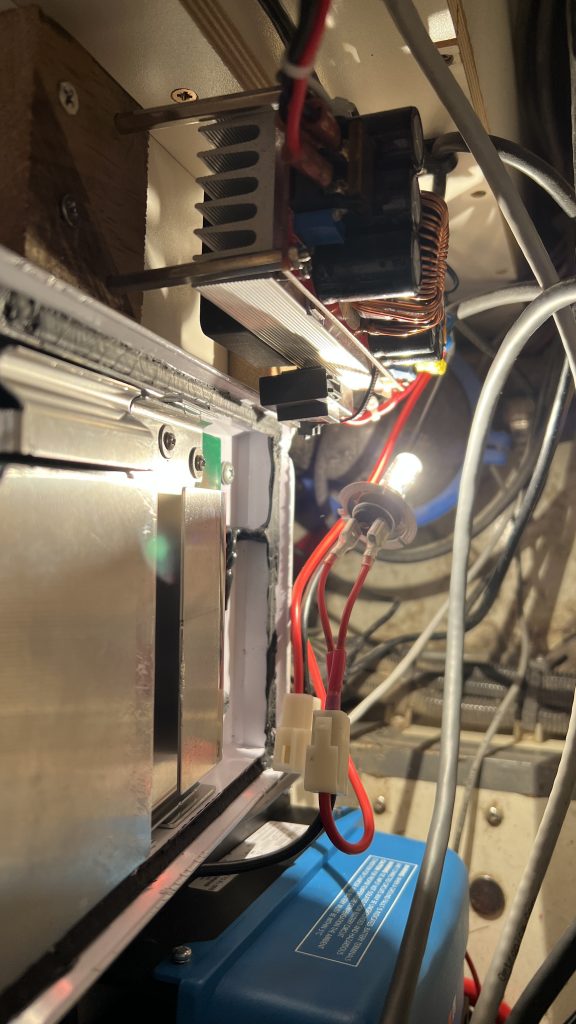
I was then able to adjust the Arduino’s current calculation to the same as the multimeter. I achieved a reading from the Arduino of 4.13A when the multimeter read 4.125A.
I then reattached the Starlink and ran it for an hour to record its average DC consumption. It was 31W.
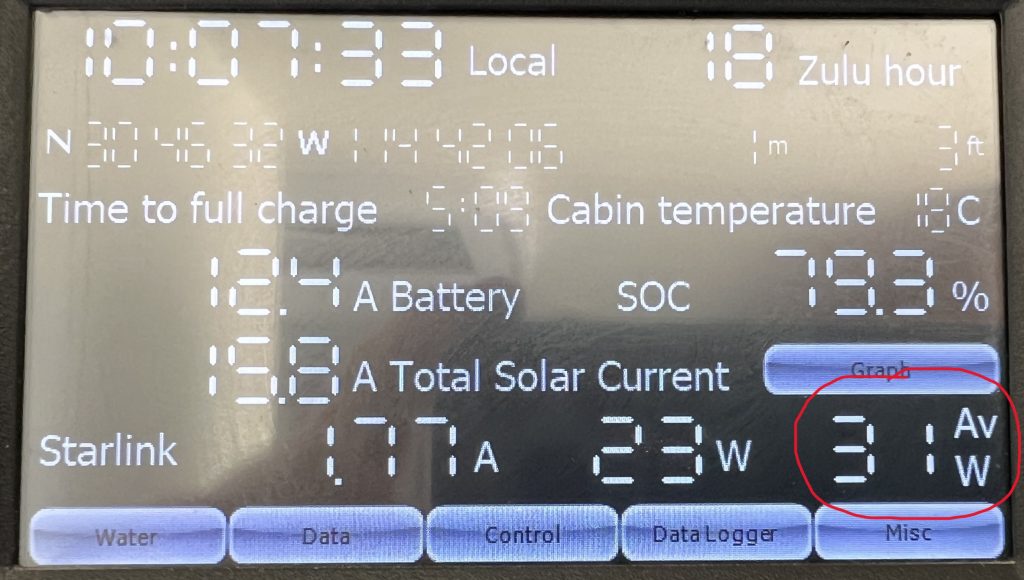
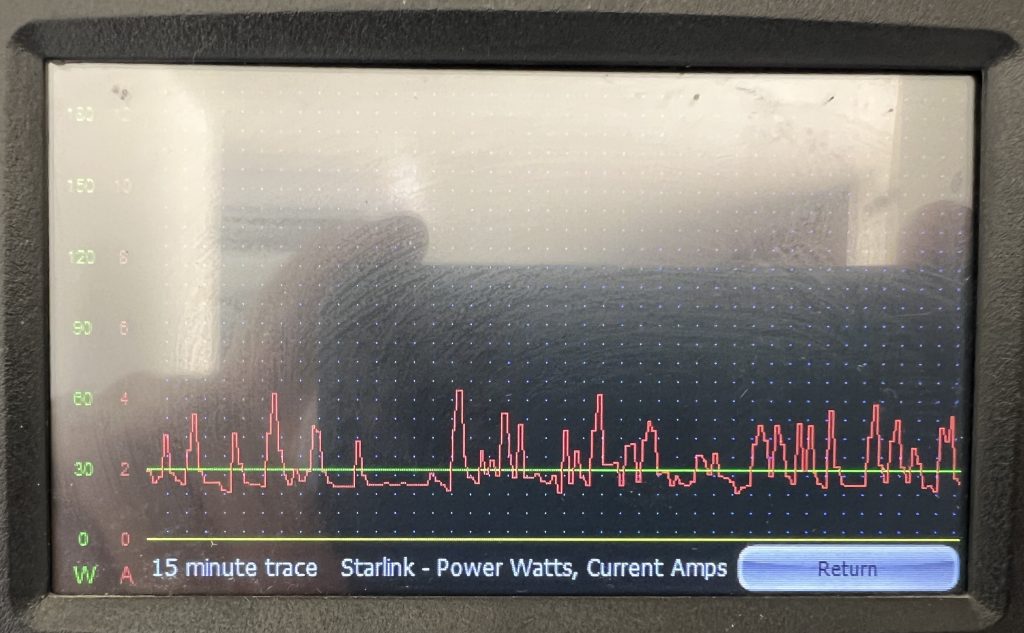
This is a higher reading than I originally published, and I do apologise for that. However, this is still a significant saving of 21.5W or 40.9%.
Update No.3 – Starlink 48V PSU adapter
To make converting the rectangular dish Starlink to DC easier I have designed a Starlink 48V PSU adapter PCB to install in place of the original mains power supply. The board is a drop-in replacement that requires a 48V DC supply. The PCB then routes the 48V to the Wi-Fi PCB and creates a 12V supply for the Wi-Fi from the 48V supply.
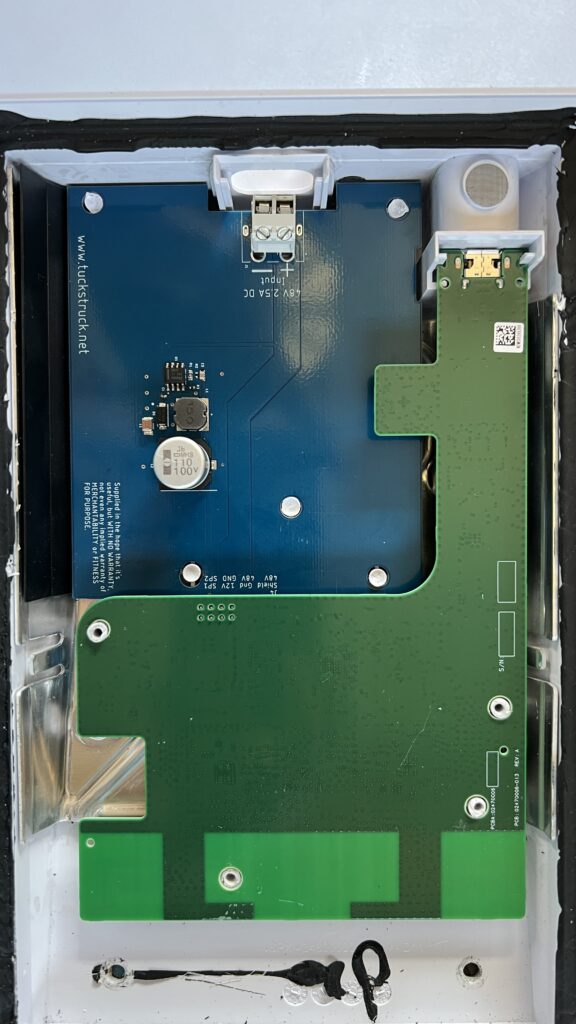
For full details of the Starlink 48V PSU adapter see here.
You may also be interested in my Starlink POE Injector design, see here and Starlink Combined DC Power Supply & POE Injector, see here.
Update No.4 – Gen 3 Starlink DC Power (21/6/24)
The Gen 3 Starlink is the easiest way yet to power from DC. The design of the router with an external power supply means that you can simply replace the mains power supply with a DC version, to supply the 57V DC that the router and dish require.
The power connector in the router is a standard 5.5 mm x 2.1 mm barrel connector. I used this one from Amazon: https://amzn.eu/d/01YXGmrM. I selected this one as it has 1.5mm² (16 AWG) copper wire, so can easily handle the power required with snow melt active. I used the same DC to DC power supply https://amzn.eu/d/0dAAHJDb that I used on my Gen 1 and Gen 2 DC conversions (I just adjusted its output voltage to 57V).
In my original article above I went to a lot of trouble to set up this power supply. However, I have been asked many times for a simplified ‘set-up’ method. Here is my quick set-up guide for this power supply:
- Remove 2 of the 20A fuses that come with the power supply. For Gen 1 and Gen 3 use a single 20A fuse, for the Gen 2 use a single 10A fuse.
- Set the current limiter to maximum power by adjusting the CC potentiometer fully clockwise.
- Set the Under Voltage Protection to the minimum voltage by adjusting the UVP potentiometer fully anti-clockwise.
- Adjust the output voltage to the required voltage Gen 1 = 56V, Gen 2 = 48V and Gen 3 = 57V (do this before connecting to the Starlink!).
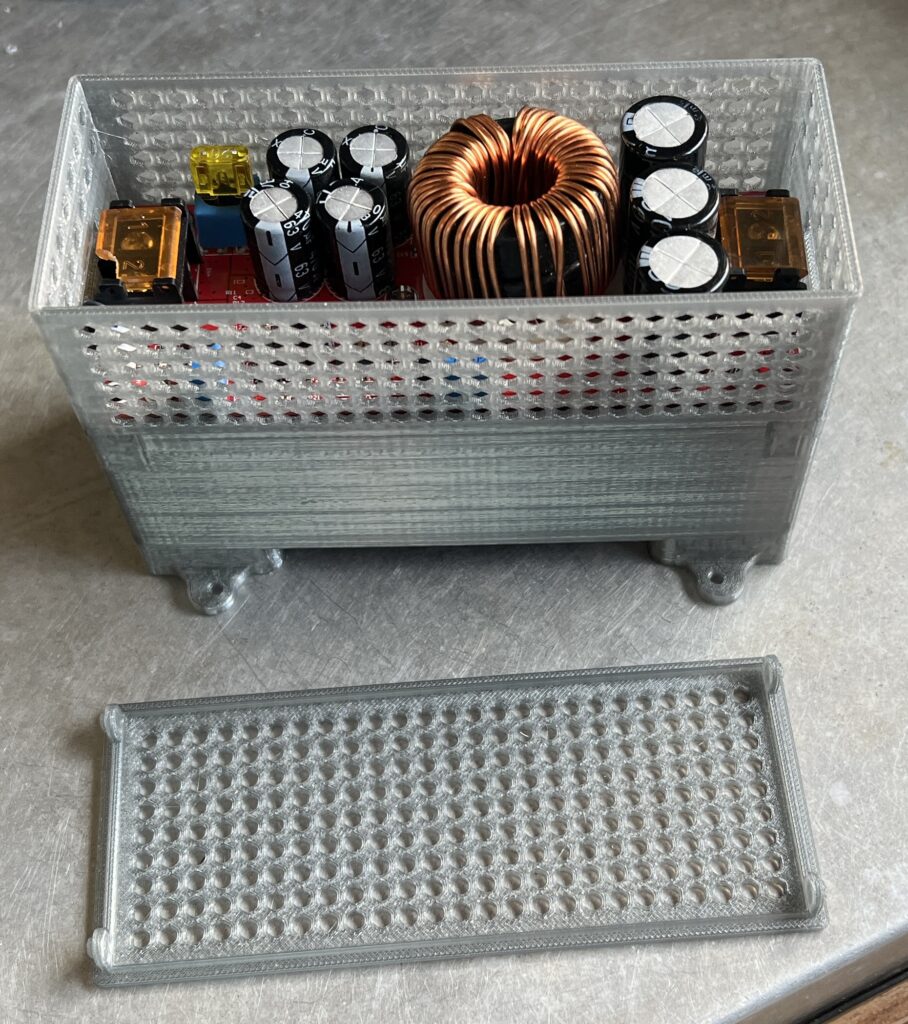
To make using this power supply easier, I have designed a 3D printable case for it ( download and print it from here: https://makerworld.com/en/models/492764#profileId-406389)
